Showing posts with label DIY. Show all posts

11.21.2012

We Made a Book Lamp


I met Erin at Creative Mornings Atlanta this summer. It was quickly established that we share a love for stationary, vintage decor and witty comebacks. Knowing Nick and I like to do projects, she sent me a photo of a lamp made out of books and asked if we might be able to help her make it. So, a couple of weeks ago, she came over for a spaghetti dinner and lamp-making workshop. It was great fun!

We followed an HGTV tutorial here. Check out a few shots from the workshop:


If you are having trouble finding interesting vintage books, hit up thrift stores and antique shops. Old Reader's Digest books have the best, patterned hardback designs. If all else fails, look on Ebay.

The supplies! For a complete list, reference HGTV's tutorial (linked above).

Ready to go!

It's all about an artful arrangement!

I know a few book lover friends that are going to cringe at this photo! We used a drill press, but the HGTV tutorial (linked above) has instructions for a standard drill.


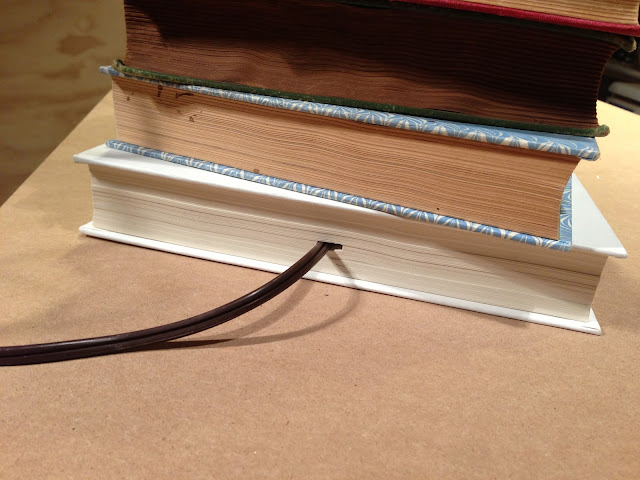
Nick cut out a "channel" of sorts with a box cutter to allow room for the cord while the book remains closed and flat.


Almost there!


You may notice the lamp kit started out a bright brass color. We decided to spray paint it with oil rubbed bronze to give the lamp a more old-timey look. Notice how it maintains a metallic shimmer? I will always choose oil rubbed bronze over flat black spray paint. It's seriously magic in a can.


Et voila! So much fun! We need to do this again, Erin!


9.04.2012

The Benefits of Standing Desks, Pt. 2- My Sit-Stand Workstation

I hope you all had a lovely, relaxing Labor Day weekend. Atlanta was cloudy for a change, but I don't mind it. It puts me in the mood for fall. If you read my last post, you are, by now, most assuredly convinced of the benefits of standing workstations. I'm making good on my promise and revealing my new sit-stand workstation-- an Ikea hack and upcycling project that is tres simple!


So, I made a trek to Ikea and purchased two of these bar tables. They are 27 inches tall, made 100% hardwood and extra sturdy.

I know it's a standing desk, but it would be unrealistic of me to have no seating options. So, I also purchased this bar stool. Sometimes you just need a break. I have been working at my desk for a few days now and I would say I spend around 60% of the time standing, 40% sitting. Much better than 100% sitting at my old desk. Be sure, if you end up getting this stool, to purchase the 29 inch option. Thankfully I had a number, and by number I mean many, unopened lamp kits to return from my lamp making days, knocking a substantial chunk off my total price. Sweet!
Then, using an old, beat up 7ft. door, we (meaning my husband with some help from Collin) fashioned a table top.


 He routed the edges of the door to give it a smoother and more tabletop-ish (not a word) feel.


Et voila!


The biggest challenge was moving it up the stairs, seeing as how this table top is a total beast. We have yet to attach it to the bar tables with screws and may do so in the future, but we tried 8 million ways to shake this thing loose off the bases (bar tables) and it does not budge. If you are not using a former fire door (like we did), you'll want to make sure and screw the bar tables to the door. If you happen to find an old door with some dimension (i.e. the indented squares which I have no fancy name for), getting a piece of glass cut in the same size will give you more ease of use and style-- allowing for snapshots, postcards and other artful ephemera to be displayed under the glass.

I absolutely love having a desk at which I can A). Both stand and sit at comfortably, B). Spread out projects with extra space for inspirational collections (see below), and C). under which I can store shipping boxes and Collin's toys, making the office less cluttered overall.


A special shout out to Charleston, SC based Rewined Candles, purveyors of the pictured, deliciously fragrant upcycled wine bottle candles. I am loving mine! Wedding and event packages are available if you are in the market for a larger quantities. Check them out!

POST SCRIPT: I forgot to mention that we did some research on ergonomically correct angles for the standing desk. Be sure your standing work desk allows you to comfortably type with your elbows at a 90 degree angle. You may even need to raise your computer screen up a bit so that it is at eye level.


6.21.2011

As Promised, the Reveal!

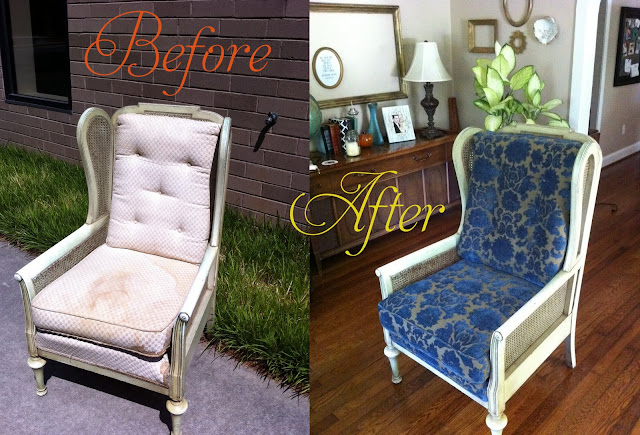
Last week I posted a picture of my sweet, albeit grungy, find from a local garage sale. I present to you, the transformation!


A HUGE thank you to the folks at Frugal Fabrics on Peachtree Industrial for having a super sale and carrying this delightful fabric and to Jose from Three Brother's Upholstery in John's Creek, who did this in record time without breaking the bank for me. They do quality work, for half the price of most upholsterers in the area (I did my footwork on this). If you live in the Atlanta area and would like their contact info, just let me know! I'm super pleased with our new living room chair:)


The patina is my favorite feature!

6.15.2011

Stay Tuned....

This grungy garage sale find had loads of potential and, once spotted on the side of the road, I made my husband turn the car around so we could get a closer look. I plan on revealing its transformation sometime next week...


6.10.2011

Summer Inspiration

Well folks, there are many a DIY projects that I plan on tackling this summer before baby comes. For the nursery, you might ask? Yes m'am. These are so cute:


click here to see a tutorial on these fabulous yarn letters!


I think this mobile, or something similar, would be easy to make from all the fabric scraps I have accumulated over the years... Stay tuned!

4.20.2011

Boomerang Tables and Baby News!

Hey friends! We were really excited to find out we are having a boy! Bring on the snips and snails and puppy dog tails! Baby boy sure has been kicking up a storm this past week. It's all starting to feel so real!

Here are a few shots of us celebrating the news at our favorite, local Thai food, Thai Star.


And here is my official 20 week shot:


In other news, the living room is almost done. Just a few more final details, but I wanted to show you our fabulous curbside save! I'll admit I was a bit skeptical when we first drove past this boomerang coffee table. Thankfully, Nick saw the potential. I love it so much! I know it's not everyone's cup of tea, but who else owns something like this? I mean, come on!


Fyi, we used Behr paint in Elephant Ear Gray.

And here is our living room in progress! We also found a sweet piece at Goodwill that will soon be our TV stand, but it's still in the garage, waiting for a good sanding and painting.


I'm liking that it's turning out to be sort of a mid-century mod/ bohemian mix!

12.11.2010

Dot Garlands


After graduation, a group of five of my dearest college friends and I lived in an old house in Wallingford, a funky little neighborhood of Seattle. We hosted many a get-together, book club, party and Bible study. The house was poorly insulated and three of us shared an upstairs loft as a bedroom, but there was never a shortage of good cheese and coffee and laughter! 

At Christmastime we decorated a tree a la "we're poor recent college grads" and my friend Robyn taught us how to make dot garlands with red circle labels from the office supply store. The only other thing you need is fishing line. Just stick one label on one side of the string and another on the other side, sealing the stickiness and delivering maximum impact. No glue required! It takes awhile, but the end result is gorgeous and whimsical-- almost as if the little dots are floating or hovering on your tree!

It's a total Martha Stewart idea, but I'm sure someone came up with it before her. Behold (see below)! So lovely and easy. The best part is that when you pack away your ornaments, you can easily save the garlands for next year's tree by taping one end down to an empty paper towel or toilet paper tube, winding it up, and taping the other end down!


I think the look is adorable and it's not just for Christmas trees. Below are some more dot garlands made of felt, fabric, and paper.


7.31.2010

Nick and Steph's DIY Weekend

These pictures speak for themselves!


I love Nick and I love garage sales and I love summer :)
Related Posts with Thumbnails